CYBER.CO.KE is an independent Cyber Services website and is not affiliated with any government agency, including Kenya Revenue Authority (KRA). A service fee is charged for the assistance provided to customers in Kenya.
Having an eCitizen Account is very important thing for any Kenyan with a National ID. This is because the eCitizen account allows you to get over 5,000 Government services from the 100+ Ministries, Counties, Departments and Agencies in Kenya. With an eCitizen account, you can enjoy the convenience of Government Services in Kenya and get information about online services and make applications quickly and easily. The eCitizen platform is normally comprised of 3 pillars of Government service provision; i. One Log-in, All Government Services (All you need is one account. Citizens and residents can register with an ID number); ii. A Single Unified Citizen’s Profile (Your information as a citizen or resident from across government will be accessible through your profile) and iii. Convenient Service Access (Search, apply and pay for services online, receive progress notifications and access all your downloads in one place).
READ ALSO: How To Change eCitizen Account Phone Number
To create eCitizen account, begin by visiting the platform and selecting your specific account type. Proceed to validate your ID details on eCitizen, providing necessary information. Enter your phone number and email address, followed by inputting the One-Time Password (OTP) sent to either your phone number or email for verification. Once confirmed, proceed to set up a secure eCitizen account password. As a final step, personalize your account by uploading a passport photo. This comprehensive process ensures the accuracy of your identification on eCitizen, enhances security, and allows you to customize your profile with a passport photo for a more personalized and secure experience within the platform.
Requirements Needed In Creating eCitizen Account
For you to create eCitizen account online for Kenyan citizens, there a set of key requirements that you need to ensure you have with you. This includes; National ID, Mobile Number, Email Address and Passport Photo. Below is s brief description of what each of these requirements entails in relation to How To Create eCitizen Account.
National ID
This is the most important requirement that is needed to enable one to create an eCitizen account online in Kenya. The details that will be need from the National ID includes; ID Number, First Name as per the ID and Year of Birth.
Mobile Number
The next requirement that will be needed in the process of creating a new eCitizen account is mobile number. This will enable you receive the verification codes from eCitizen that are needed for purposes of verifying and authenticating you newly created eCitizen account.
Email Address
Just like the mobile number, the email address sole purpose is to receive the eCitizen verification code. The purpose of getting verification codes as the name suggest is to verify your account when you create it online.
Passport Photo
The last requirements in the process of creating eCitizen account is the passport photo or simply photo. You need to attach a passport size photo of yourself during the process of creating a new eCitizen account online in Kenya.
How To Create eCitizen Account
The following are the 7 main steps involved in the process of How To Create eCitizen Account that you need to follow.
Step 1: Visit eCitizen
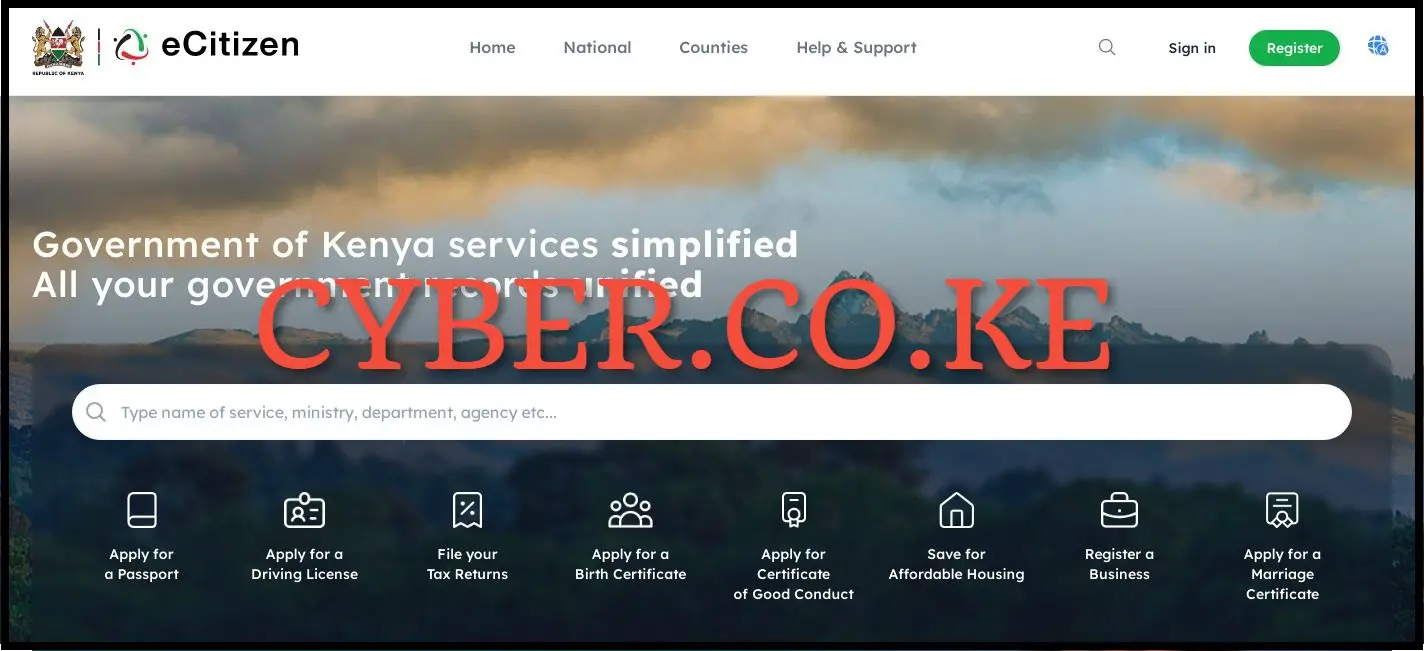
The first step in the process of creating eCitizen account online is to visit eCitizen using https://accounts.ecitizen.go.ke/en then click on the “Register” button to proceed to step 2 below.
Step 2: Select eCitizen Account Type
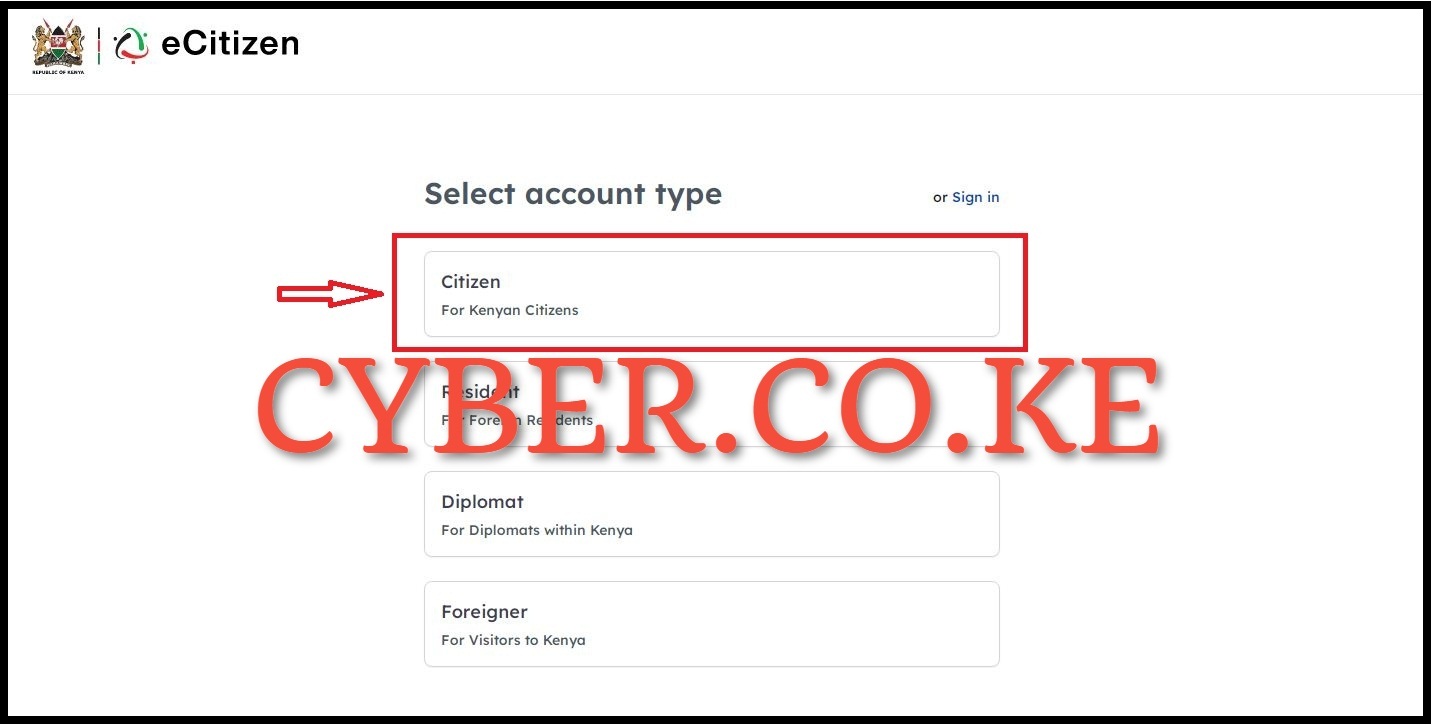
In this step, you need to select the eCitizen account type that you want to create. Normally there are 4 main types of ecitizen accounts i.e. Citizen (for kenyan citizens), Resident (for foreign residents), Diplomat (for diplomats within kenya) and Foreigner (for visitors to kenya). In this example, we shall be creating an ecitizen account for Citizen (kenyan citizens). So, select “Citizen” to proceed to the next step of creating eCitizen account.
Step 3: Validate ID Details On eCitizen
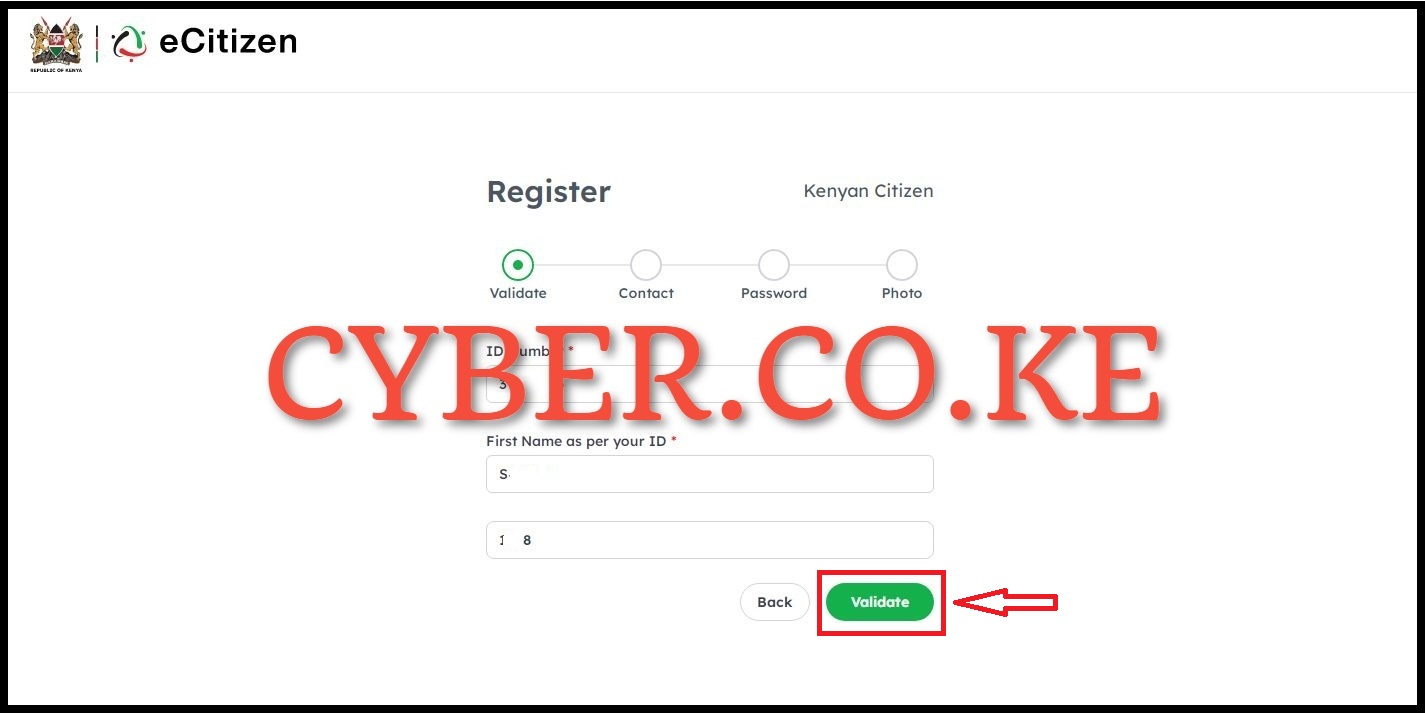
Next, you need to enter your ID Number, First Name as per your ID and Year of Birth. Once you have entered these 3 details, click on the “Validate” button to validate the details on eCitizen. Once the details are validated properly on eCitizen, it will populate the full names of the citizen and the id number as shown below, then you can proceed to the next step.
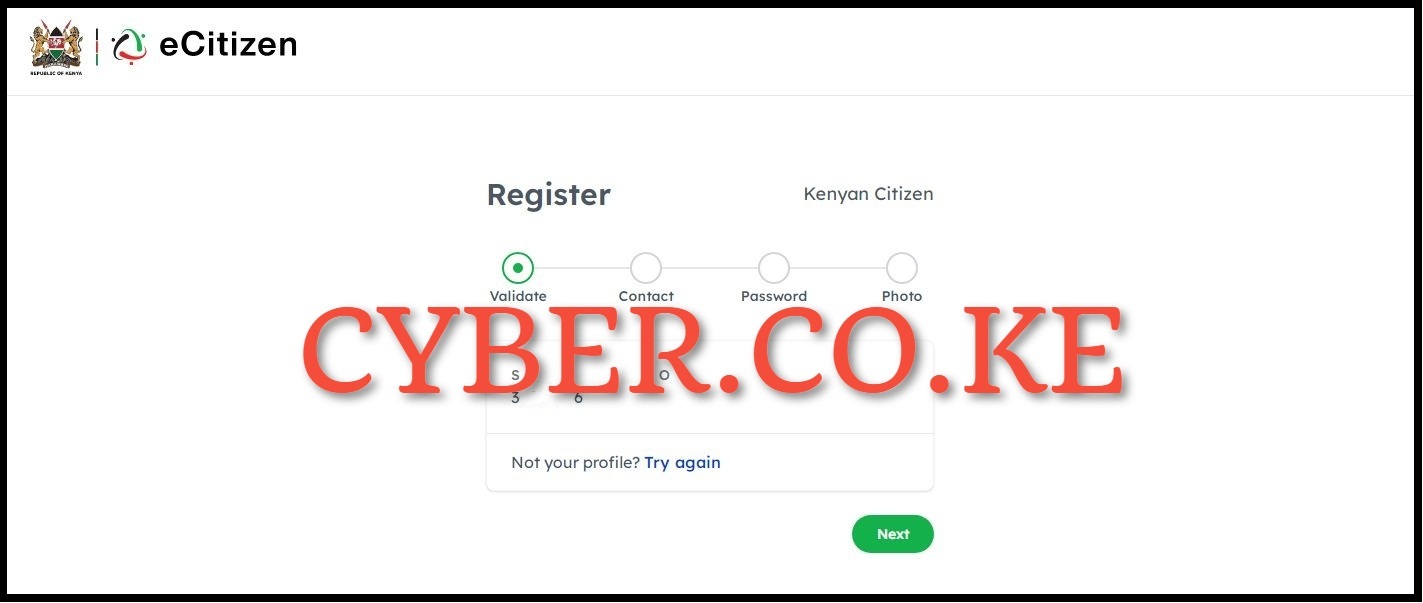
Once you have verified the names are correct as per your National ID, then you can proceed to the next step after validating your ID details on eCitizen, by just clicking on the “Next” button to proceed to step 4.
Step 4: Enter Phone Number and Email Address
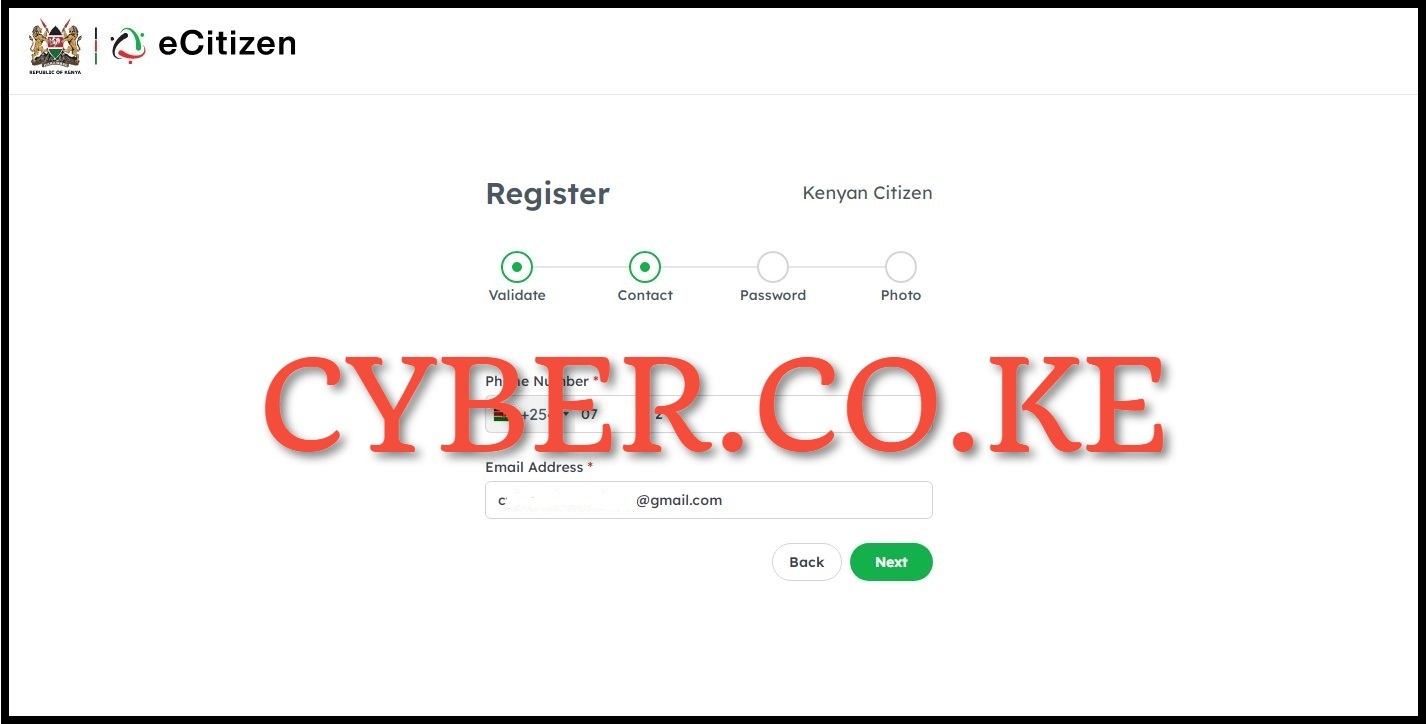
In this step, you need to enter your phone number and email address which will be used in your eCitizen account. These two are required in this process of creating eCitizen account for purposes of receiving the eCitizen verification code for verifying your newly created eCitizen account online. Once you have entered the phone number and email address, click on the “Next” button.
Step 5: Enter OTP Sent to Phone Number or Email Address
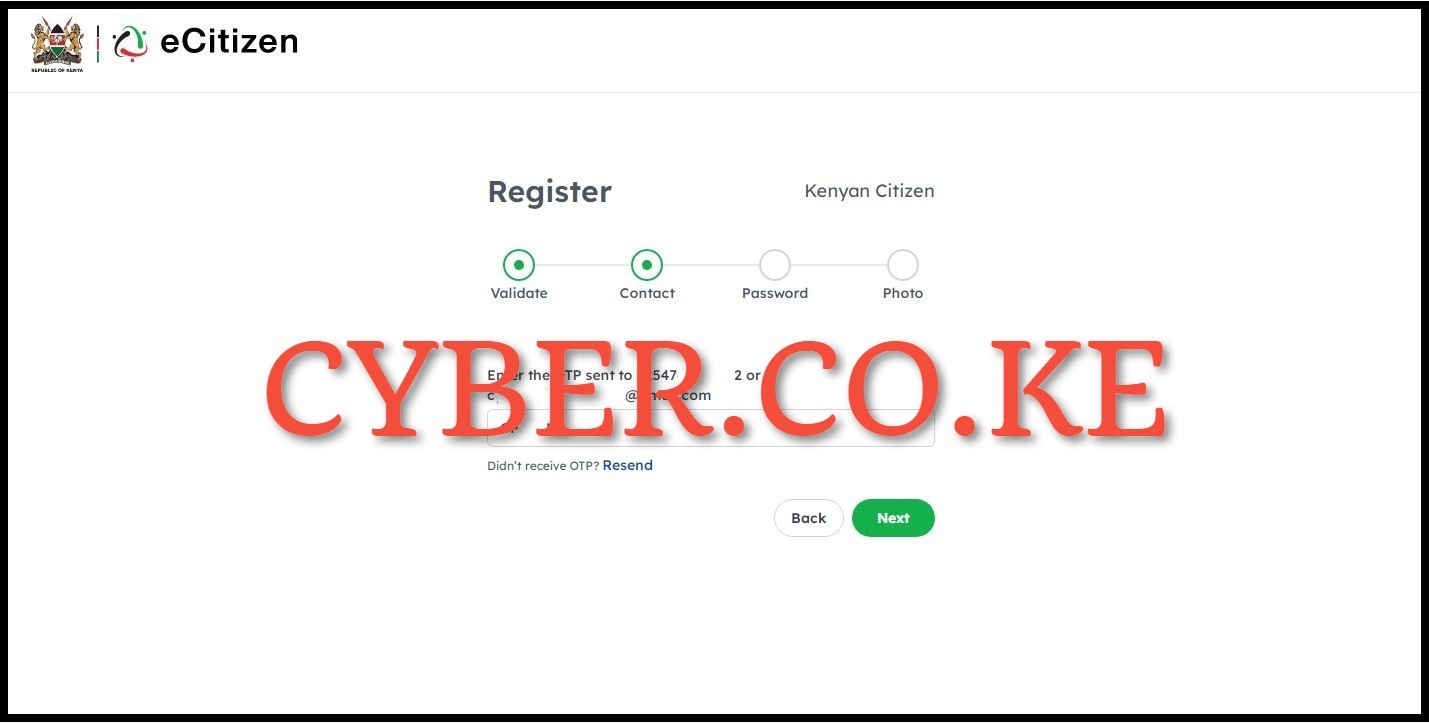
Next, enter the eCitizen account verification code that has been sent to both your phone number and email address. Take note that the verification codes sent via sms and email address are the same. So, enter the eCitizen account verification code and click on the “Next” button.
Step 6: Setup eCitizen Account Password
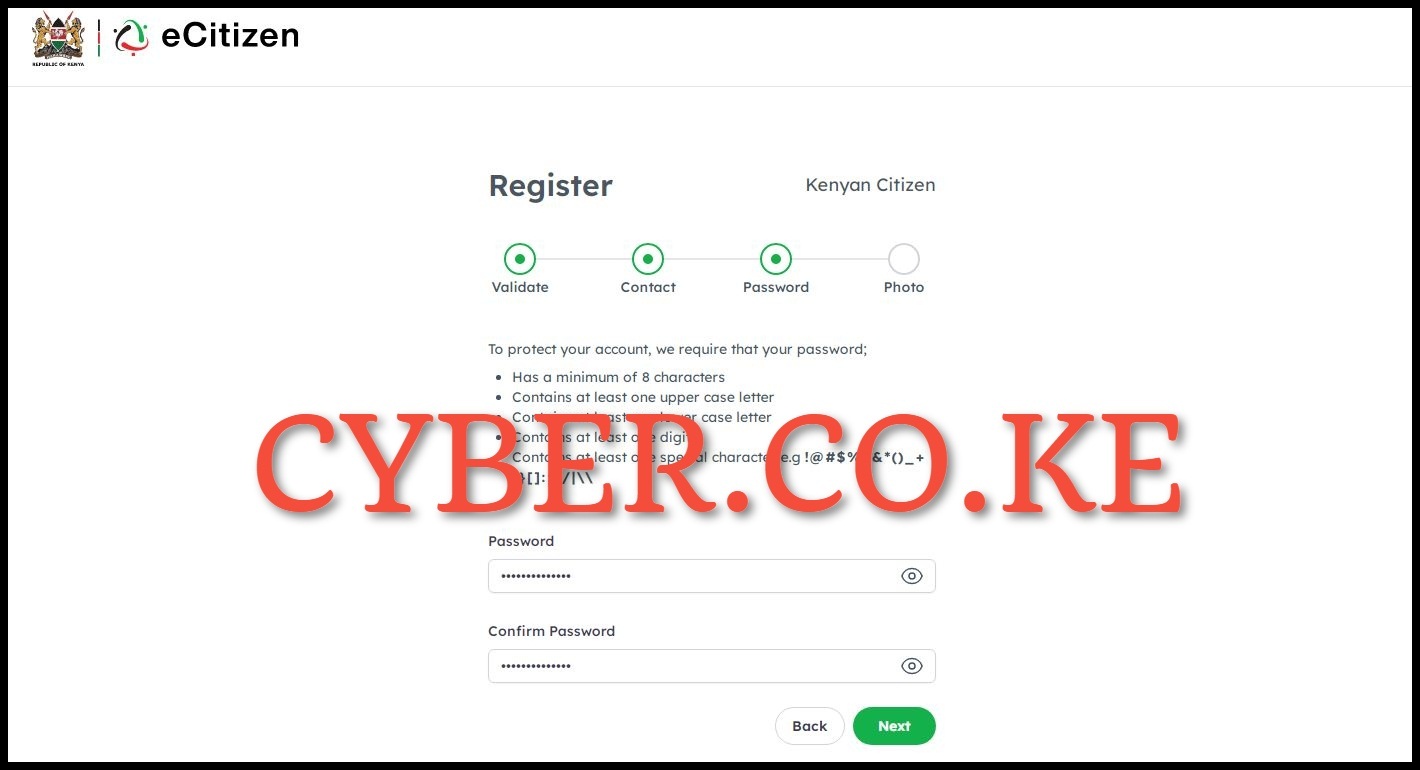
In this step, you need to setup a new password for your eCitzen account. To protect your eCitizen account, you are required to ensure that your password;
- Has a minimum of 8 characters
- Contains at least one upper case letter
- Contains at least one lower case letter
- Contains at least one digit
- Contains at least one special character e.g !@#$%^&*()_+{}[]:;?/|\\
Once you have setup the new password for your eCitizen account, click on the “Next” button to proceed to the last step.
Step 7: Upload Your Passport Photo
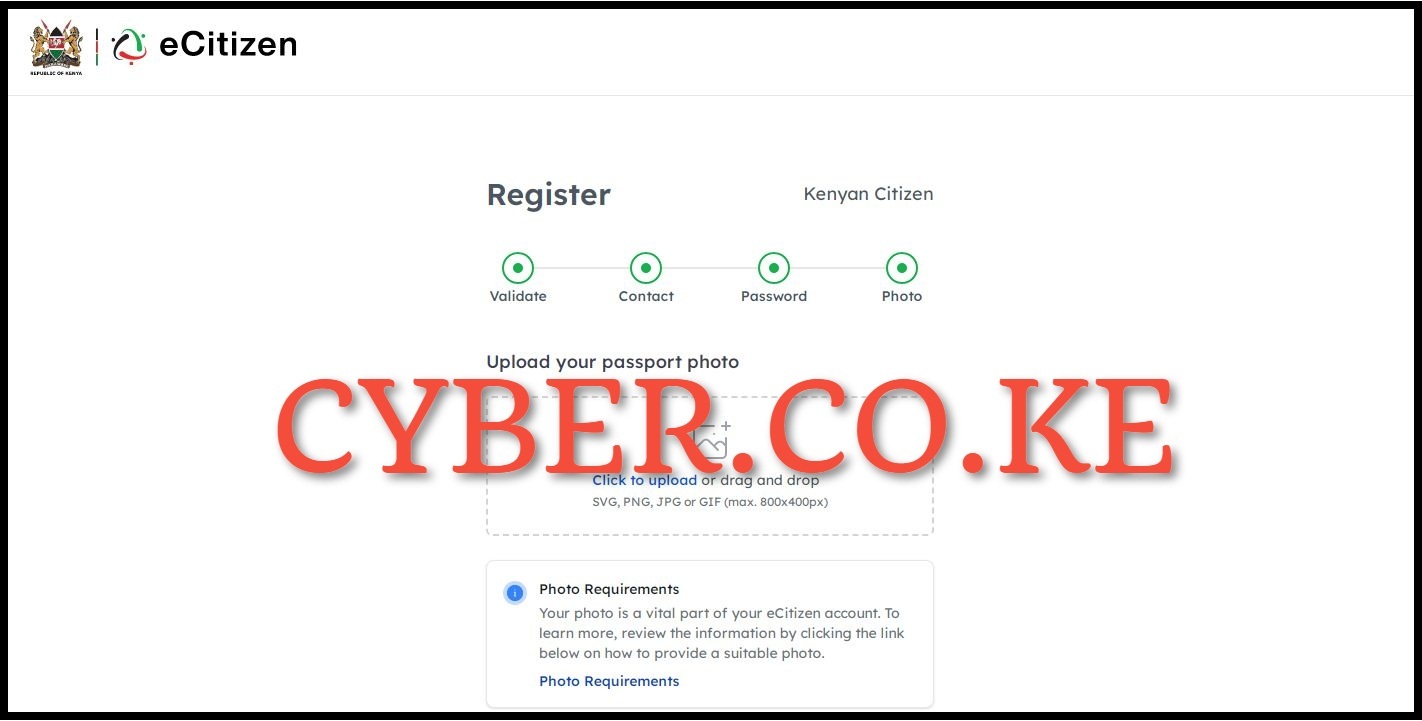
The last step of the process of creating a new eCitizen account is upload your passport size photo. You need to take a good password photo and upload it in you eCitizen account and to to that just click on the “Click to Upload” feature. Your photo is a vital part of your eCitizen account. The following are the photo requirements for eCitizen profile photo in Kenya.
- The photo must be in color.
- The photo must be taken within the last 6 months.
- The photo must be in JPEG format.
- The photo must be at least 500 pixels wide and 500 pixels tall.
- The file size of the photo must not exceed 2MB.
- The background must be plain and light-colored (preferably white).
- The applicant must face the camera directly, with a neutral expression and both eyes open.
- The head must be centered within the frame, with the face taking up most of the frame.
- The photo must be clear and in focus, with no shadows or reflections.
- The applicant must not wear glasses or any head covering, except for religious reasons.
- The applicant must not wear any clothing that covers the neck or the shoulders.
It is important to note that failure to meet any of these passport size photo requirements may result in the rejection of the eCitizen profile photo. So ensure you upload a good passport photo in your eCitizen account.

Once you have uploaded the passport photo, tick the check box titled “I agree to the terms and conditions” as shown above and click on the “Complete” button to finish the process of creating your new eCitizen account.
READ ALSO: How To Change eCitizen Account Email Address
Once you have completed the above 7 steps of creating eCitizen account online, you will be re-directed to the eCitizen login page when you can login to your newly created eCitizen account using both your ID Number and eCitizen password that you used. The process of creating eCitizen account online is much easier as long as you follow the above listed 7 steps of How To Create eCitizen Account online in Kenya.

Matthews Ohotto is a Writer at CYBER.CO.KE where he specializes in writing helpful and informative Step-by-Step Tutorials that empower Kenyans with practical skills and knowledge. He holds a Bachelor’s Degree in Business Information Technology (BBIT) from Jomo Kenyatta University of Agriculture and Technology (JKUAT). Get KRA Individual Services and KRA Returns Services in Kenya.
ADVERTISEMENT
Check Out Our Popular Blog Posts
Check Out Our KRA Individual Services
Register KRA PIN Number
Submit Service Request →Retrieve KRA PIN Certificate
Submit Service Request →Update KRA PIN Number
Submit Service Request →Change KRA PIN Email Address
Submit Service Request →Check Out Our KRA Returns Services
File KRA Nil Returns
Submit Service Request →File KRA Employment Returns
Submit Service Request →File KRA Amended Returns
Submit Service Request →File KRA Withholding Tax Returns
Submit Service Request →Check Out Our KRA Tax Calculators
Calculate Turnover Tax (TOT)
TOT Calculator →Calculate Monthly Rental Income (MRI)
MRI Calculator →Calculate Value Added Tax (VAT)
VAT Calculator →Calculate Pay As You Earn (PAYE)
PAYE Calculator →CYBER.CO.KE
Get KRA Services Online Today
CYBER.CO.KE is a trusted online cyber services website dedicated to providing KRA Individual Services and KRA Returns Services to customers in Kenya on a day to day basis.
The KRA Individual Services that we offer to customers includes: Registration of KRA PIN Number, Retrieval of KRA PIN Certificate, Updating of KRA PIN Number and Changing of KRA PIN Email Address.
The KRA Returns Services that we offer to customers includes: Filing of KRA Nil Returns, Filing of KRA Employment Returns, Filing of KRA Amended Returns and Filing of KRA Withholding Tax Returns.
If you are looking for dependable, fast and reliable KRA Services in Kenya, we are ready and available to support you at every step of the way.
We prioritize customer convenience, clear communication and prompt service delivery, making sure that your submitted service request is completed in the shortest time possible.
ADVERTISEMENT


