Learn how to easily file Nil Returns using the KRA Portal quickly and easily on CYBER.CO.KE Portal. Our step-by-step guide will walk you through the process, ensuring you file your Nil Returns before the 30th June Deadline.
The deadline for filing Nil Returns is fast approaching and it high time as a taxpayer in Kenya you learn the steps that are involved in filing Nil Returns on KRA Portal. By filing your Nil Returns before the 30th June deadline set by Kenya Revenue Authority (KRA), you will save yourself from the Kshs. 2,000.00 penalty that is imposed on late filing of KRA Returns.
In this article, I will be sharing with you all the necessary steps that as a KRA PIN holder in Kenya need to follow during the process of filing Nil Returns on KRA Portal. It is important to take note that Nil Returns Filing only applies to students and those who are unemployed i.e. don’t have an active source of income.
READ ALSO: How To Get A Copy Of KRA PIN Certificate Using KRA Portal
To be able to file your Nil Returns using KRA Portal, there are two important things that you need to ensure you have before beginning the whole process of filing Nil Returns on KRA Portal. This includes: KRA PIN Number and KRA Password. I will briefly explain what each of these requirements that are needed in filing Nil Returns entails.
Requirements Needed To File Nil Returns Using KRA Portal

To be able to file Nil Returns on KRA Portal you need to have both your KRA PIN Number and KRA Password. These are the main requirements in the process of filing Returns using KRA Portal.
1. KRA PIN Number
KRA PIN Number is the most important requirement that you need to have with you. If by any chance you have forgotten or you don’t remember your KRA PIN, you can submit KRA PIN Retrieval order online here at CYBER.CO.KE Portal and our team of experts will be able to assist with with PIN Retrieval request.
At the same time, if you are looking for a new KRA PIN, you can get it here in 3 minutes by submitting your KRA PIN Registration order today at CYBER.CO.KE Portal. Your KRA PIN Certificate will be sent to your Email Address once the Request for PIN Registration has been done and processed from our Support team.
2. KRA Password
The next requirement that you need to have with you is your KRA Password. You will need the KRA Password to access your KRA Portal Account. If you don’t know or have forgotten your KRA Password, you can check our article on How To Reset KRA Password. Once you have requested for password reset, a new password will be emailed to you and you can use it to log into your KRA Portal Account.
You can only change or reset your KRA Password if the email used in KRA iTax Portal is the same as the one you currently have. If you don’t remember or need to change your KRA Email Address, you can submit KRA PIN Change of Email Address order online at CYBER.CO.KE Portal and have your Email Address changed so as to enable you Reset KRA Password.
How To File Nil Returns Using KRA Portal
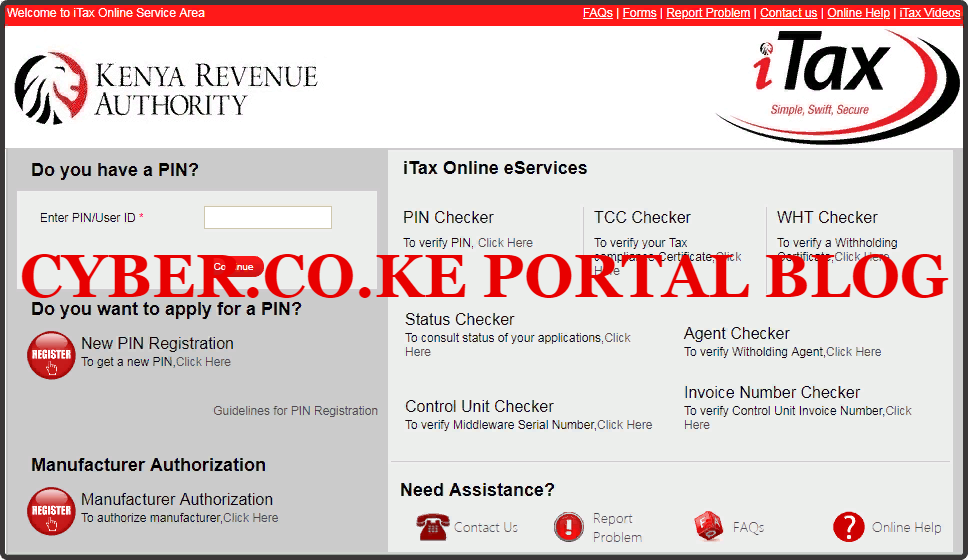
Step 1: Visit KRA Portal
The first step in the process of How To File Nil Returns Using KRA Portal that you need to take is to ensure visit the KRA Portal. You can click on https://itax.kra.go.ke/KRA-Portal that will take you to the KRA Portal.
Step 2: Enter KRA PIN Number
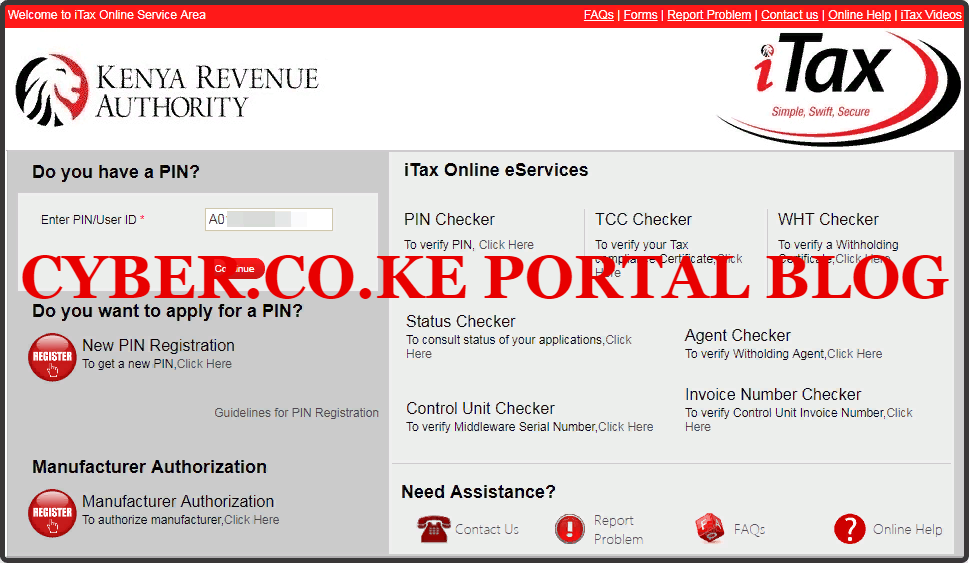
In this step, you will need to enter your KRA PIN Number. If you have forgotten your KRA PIN, you can request for KRA PIN Retrieval here at CYBER.CO.KE Portal and your KRA PIN will be sent to your email address immediately. Once you have entered your KRA PIN, click on the “Continue” button to proceed to the next step.
Step 3: Enter KRA Password and Solve Arithmetic Question
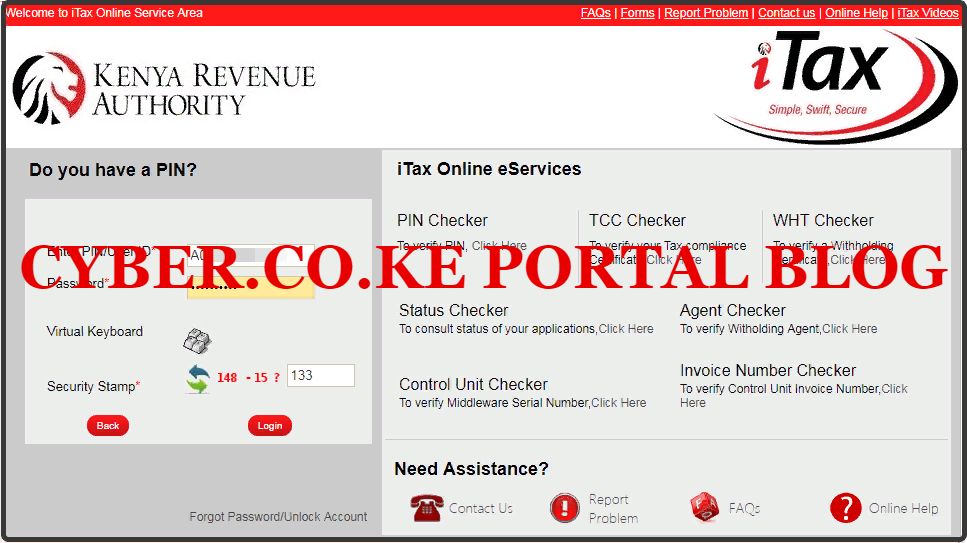
In this step, you will be required to enter your KRA Password and also solve the arithmetic question (security stamp). If you have forgotten your KRA Password, you can check our article on How To Reset KRA Password. A new password will be sent to your email and you can use it to login. Once you have entered your KRA Password, click on the “Login” button to access your KRA Portal.
Step 4: KRA Portal Account Dashboard
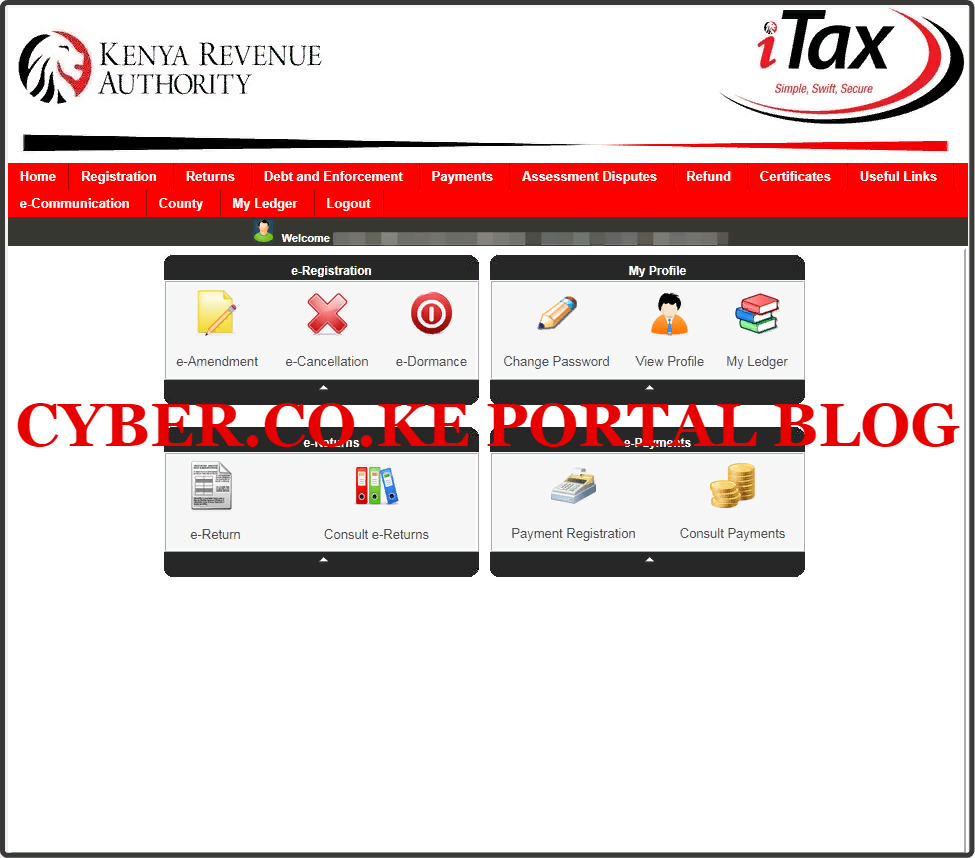
Once you have entered the correct KRA Password and solved the arithmetic question (security stamp) as illustrated in Step 3 above, you will be logged in successfully and be able to see and access your KRA Portal Account Dashboard.
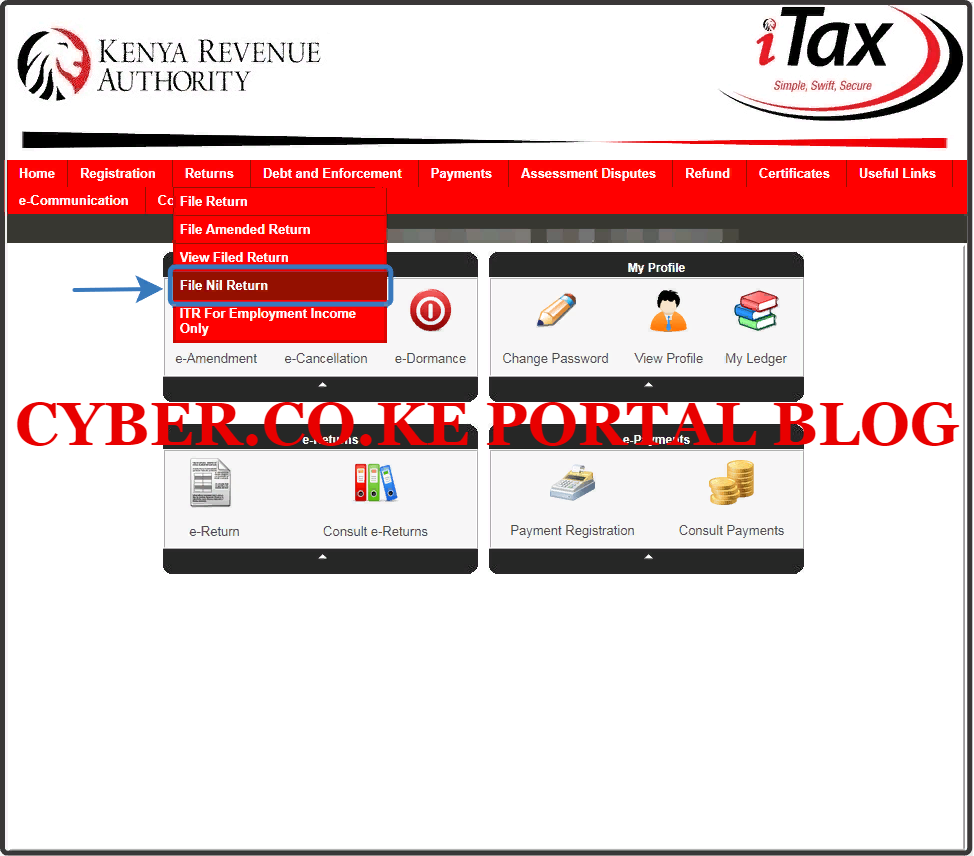
Step 5: Click On The Returns Menu Tab Followed By File Nil Return
In this step, on the KRA Portal Account menu list, navigate to “Returns” menu tab and click on “File Nil Return” from the drop down menu list. This is as illustrated in the screenshot below.
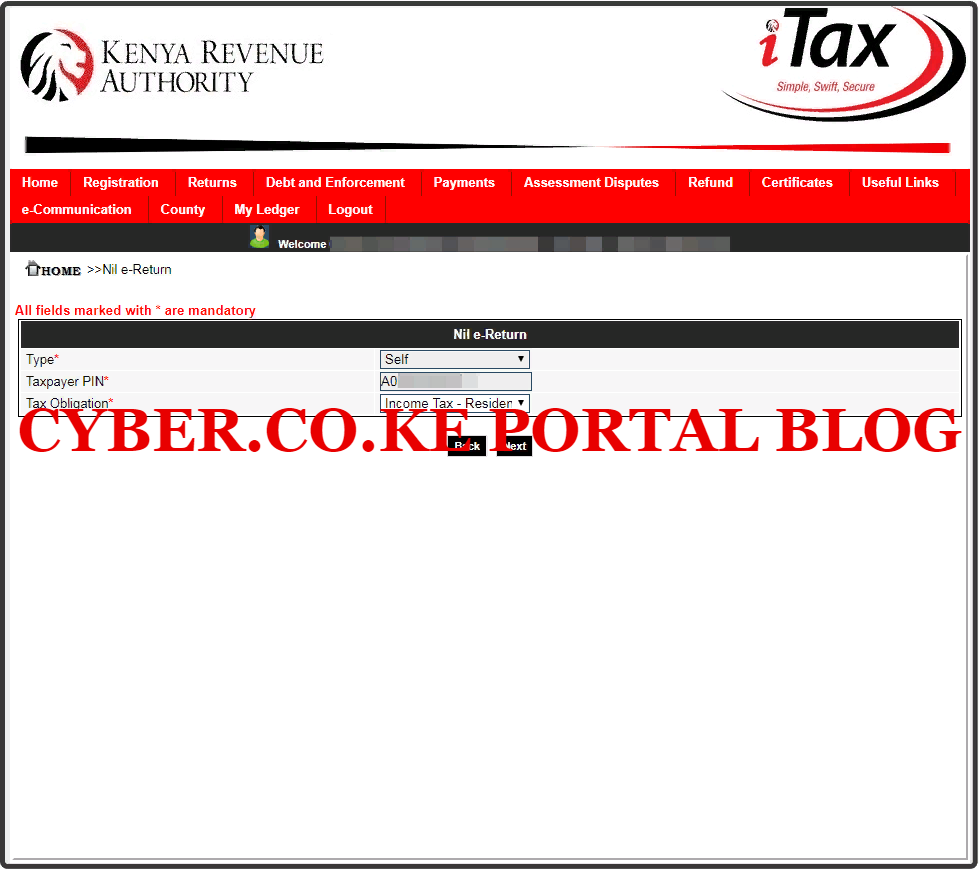
Step 6: Select Tax Obligation As Income Tax Resident Individual
In the Nil e-Return Form, under the Tax Obligation part, select Income Tax Resident Individual since we are filing Nil Return for a Resident Individual (Kenyan Resident). The other two fields i.e Type and Taxpayer are automatically pre-filled by the system.
Step 7: Fill In The Income Tax Resident Individual Nil e-Return Form
In this step, on the Nil e-Return Form, you need to select the date for the Nil Return Period From part. Since we are in 2023, we are filing Nil Returns for the year 2022. So the Nil Return Period From date will be 01/01/2022 and the Nil Return Period To date will be automatically pre-filled by the system to 31/12/2022.
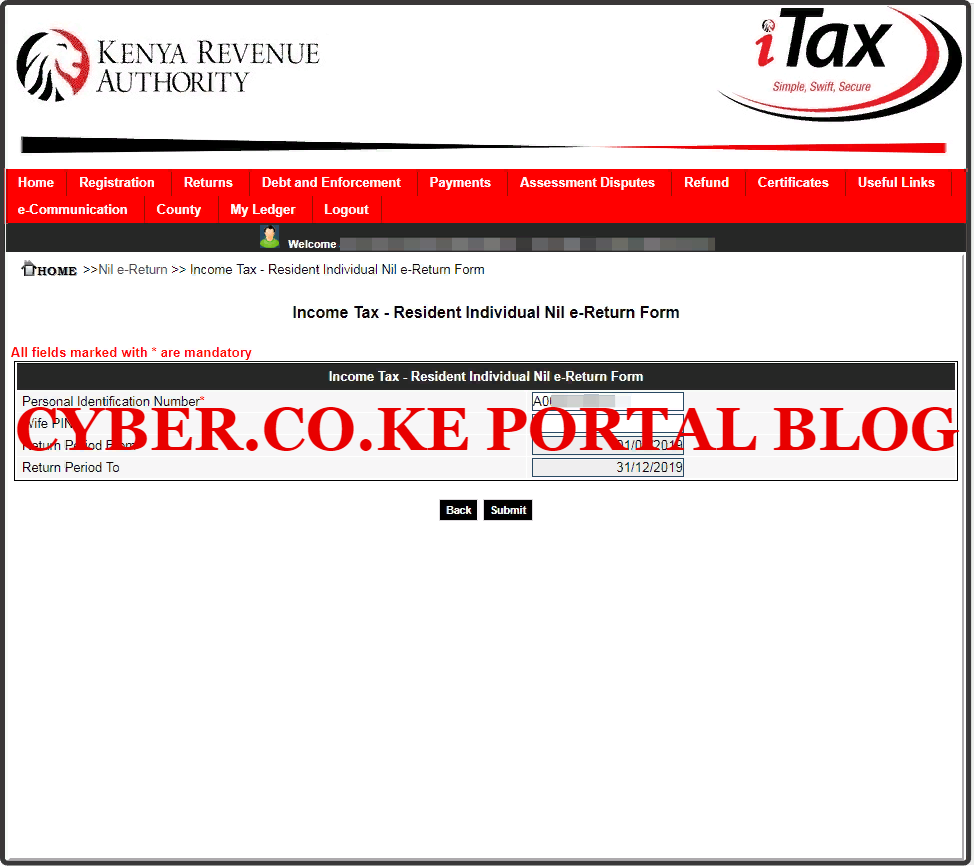
Once you have entered the Nil Returns dates 01/01/2022 – 31/12/2022 on the Nil Returns form, click on the “Submit” button to submit the Nil Return to Kenya Revenue Authority (KRA). A pop up notification from itax.kra.go.ke will appear as shown below:

The popup message simply states: “Dear taxpayer, filing of KRA Nil Returns is only applicable in cases where you have no transactions to declare for the period. Are you sure you want file KRA Nil Return? Since that is what we are filing here, click on the “Yes” button.
Step 8: Download Nil Returns Acknowledgement Receipt
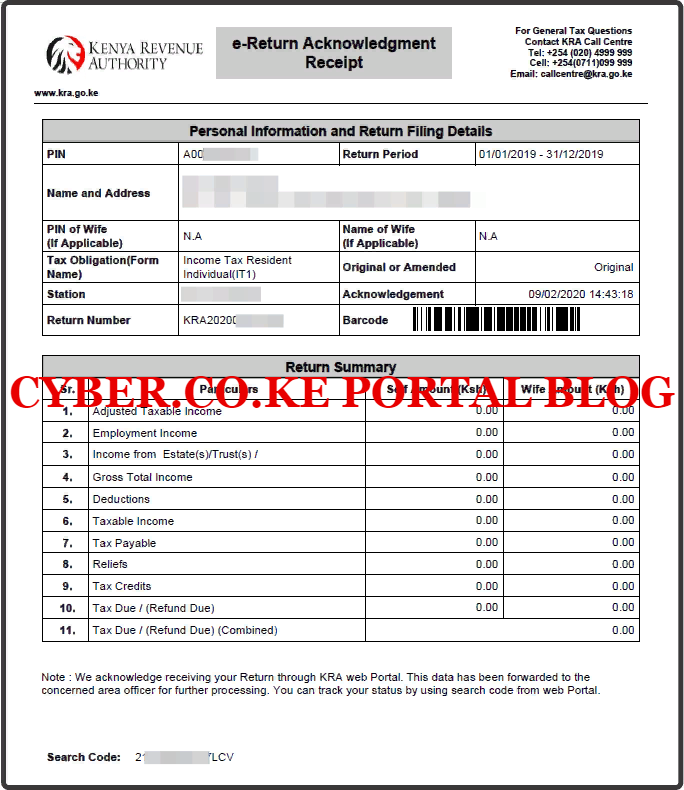
In this last step, you will need to download the Nil Returns Acknowledgement Receipt that has been generated by the KRA Portal successfully. This is a final confirming that your Nil Return has been successfully submitted to Kenya Revenue Authority (KRA). An Acknowledgement Receipt Number (KRA Receipt or KRA Returns Receipt) will also be generated for that Nil Return that we have just filed on KRA Portal.
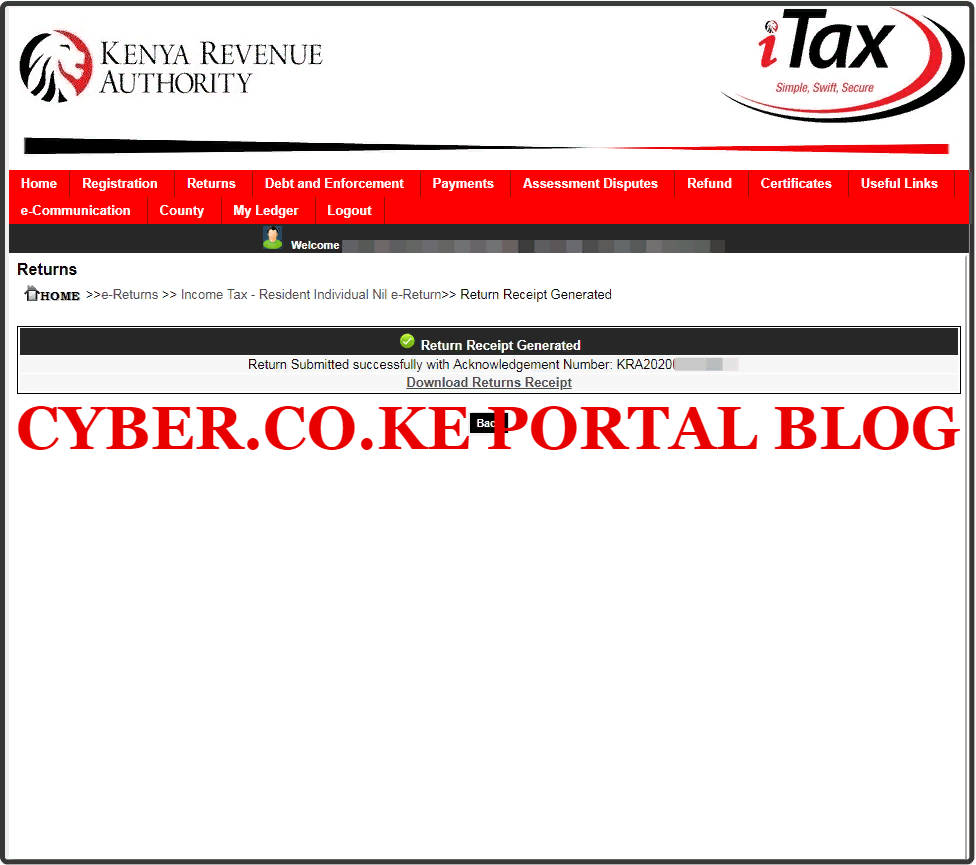
Below is the Nil Returns e-Return Acknowledgement Receipt that is a final confirmation that we have successfully filed the Nil Returns on KRA Portal. The same acknowledgement receipt will also be sent to your KRA Portal registered email address.
READ ALSO: New Taxpayers: How To Login For The First Time To KRA Web Portal
DON’T MISS OUT. CHECK OUT OUR TRENDING POPULAR BLOG POSTS IN KENYA.
How To Download KRA PIN Certificate Online (In 5 Steps)
How To File KRA Nil Returns For Students On iTax (KRA Portal)
How To File KRA Nil Returns For Unemployed On iTax (KRA Portal)
KRA PIN REGISTRATION
How To Check If You Have Filed KRA Returns (In 4 Steps)
How To Change or Reset iTax Password Online (In 7 Steps)
How To Change or Reset KRA Password Online (In 7 Steps)
KRA PIN RETRIEVAL
How To Change Email Address Registered On iTax (KRA Portal)
How To Apply For Tax Compliance Certificate On iTax (KRA Portal)
How To Download Tax Compliance Certificate On iTax (KRA Portal)
KRA PIN UPDATE
How To Generate KRA Payment Slip On iTax (KRA Portal)
How To Download KRA Returns Receipt Online (In 5 Steps)
How To Check Your KRA PIN Using KRA PIN Checker (iTax PIN Checker)
KRA PIN CHANGE OF EMAIL ADDRESS
Stay Tax Compliant in Kenya
Contact our customer support team today for fast and reliable assistance with all your KRA Services via Call, SMS or WhatsApp - 0723 737 740 or alternatively send us an email using: [email protected] for prompt and immediate assistance today.

